Windows users had to rely upon third-party applications such as WinZip or WinRAR. Now that the support is available, you can Zip or Unzip Files in Windows 11. So, in the following guide, we will walk you through the steps to zip and unzip files quickly in Windows 11.
What is a ZIP File?
ZIP file is a file format that is used to compress. A single file can be compressed using the ZIP format to reduce the file size. It is also possible to compress two or more files together in a particular location, reducing the overall size of the files. The advantage of using the ZIP format is the reduced disk space, making it easier to transport the files via external drives or the internet. The receiver of the ZIP file can unzip or extract the ZIP file after the transportation to access the original documents. It is a convenient method and is used globally in the digital workspace. The compression method of ZIP files helps to send data faster, which is the reason ZIP files are so popular.
How does the ZIP File work?
The working of the ZIP files is straightforward. The ZIP files remove excess data and encode the information into fewer bits. This process is called “Lossless Data Compression.” This process ensures you don’t lose any data during the compression and decompression process.
How to Zip Files in Windows 11
Now that you understand the ZIP file and how it works, it is time to know the steps for Zip Files in Windows 11. So, without further ado, let’s get into it.
Create ZIP Files in Windows 11
Windows 11 is the most advanced version of the Microsoft Windows operating system. Unlike the older Windows operating systems, Windows 11 has several new integrated features, including file compression. So, it is not required to install any third-party applications to create ZIP files on Windows 11. File Explorer will do the trick.
- Open File Explorer by pressing Win + E keyboard shortcut.
- Navigate to the location of the target file or folder.
- Click the New option on the top left of the command bar.
- Select the Compressed (zipped) Folder option from the drop menu.
- Type a name for the ZIP folder and hit Enter.
- Choose the files and folders you want to compress.
- Make right-click and select the Cut option from the drop menu. You can choose the Copy option if you want to keep the original files.
- Double-click to open the new ZIP folder.
- Select the Paste button from the command bar. After completing the steps, the compression process will be initiated, and after the process is completed, the .zip file will be created. You can also right-click on the files you want to compress after selecting them and choose the Compress to ZIP file option from the drop menu.
How to Share a ZIP Folder
After the files are compressed, and the ZIP folder is successfully created, you can share it with nearby devices or through email.
- Launch File Explorer.
- Navigate to the ZIP folder.
- Select the ZIP folder and click the Share Button from the command bar.
- A new Share window will pop up on the screen. You can share files using Nearby Sharing or choose a contact or email app to send the ZIP folder. After that, follow the on-screen instruction to send the ZIP folder successfully.
How to Unzip Files in Windows 11
Suppose you have received a Zip file on your Windows 11 computer and now want to unzip it. There are as many as four ways to unzip a file in Windows 11. We have listed all four of them below.
With File Explorer
You created a ZIP file using File Explorer in the previous method, and you can also unzip it using the same on Windows 11. There’s no need to rely entirely upon third-party compression tools such as WinZip or WinRAR. Here are the steps.
- Right-click on the ZIP file and select the Extract All option from the drop menu. Alternatively, you can simply select the ZIP file and click the Extract option from the command bar.
- After selecting the extract option, a new window appears. You can choose the destination folder from here. But you can also keep it the same, and the files will be extracted at the zipped folder’s location.
- Alternatively, you can unzip specific files in the case; you don’t want to look at all the files inside the ZIP but only specific one or two files.
- Open the ZIP file by double-clicking it.
- Copy the specific file.
- Move back and create a New Folder.
- Paste the file inside the new folder. This way, you can extract specific files from a compressed ZIP file.
With Command Prompt
You can also use the Command Prompt to extract ZIP files in Windows 11. In 2018, it was enhanced with the powerful TAR command line that enables it to extract or unzip files, similar to Linux systems. Here are the steps to do it.
- Go to the location of the ZIP folder in your hard drive.
- Click the Address Bar and type CMD. Hit Enter.
- The Command Prompt will be launched; type the following command there. Replace the “filename” in the command with the actual file name. Hit Enter afterward to execute. After executing the steps, the ZIP file will be extracted or unzipped in the exact location.
With PowerShell
Besides the Command prompt, Windows 11 can also use PowerShell to extract ZIP files. Here are the steps you need to follow.
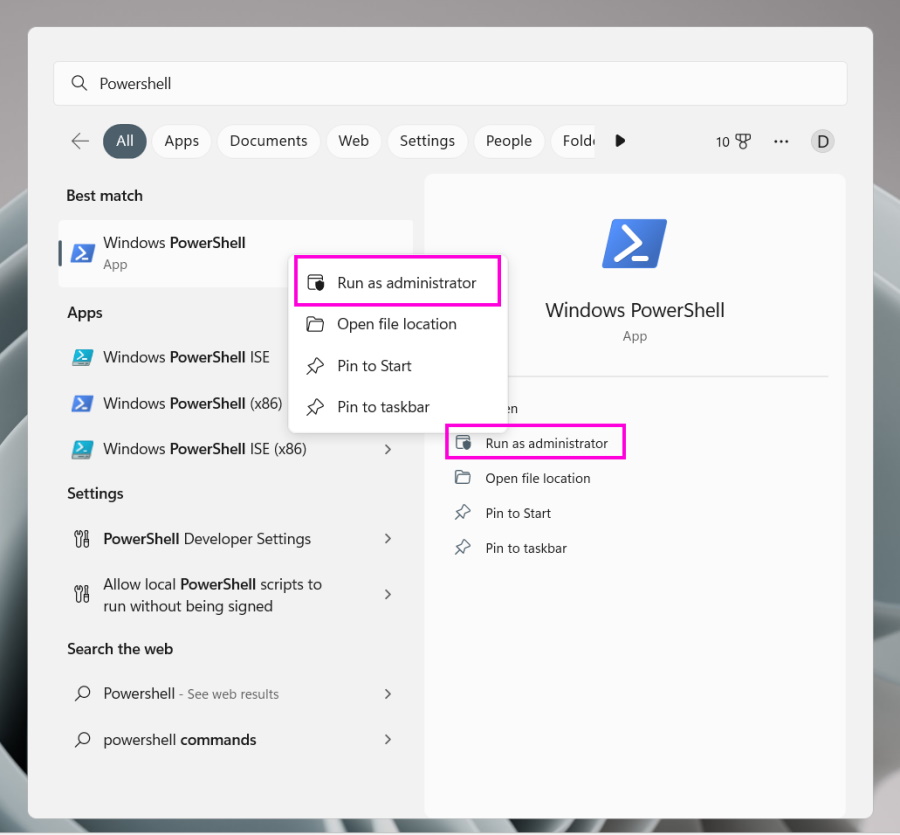
- Click the Windows button on the Taskbar and type PowerShell.
- Right-click on PowerShell and select Run as Administrator.
- After that, right-click on the ZIP file and select Copy as Path option from the drop menu. The ZIP file address will be copied to the clipboard.
- Now, run the following command in PowerShell. Replace “path of ZIP file” with the actual path copied earlier.
- According to the command, the ZIP file’s contents will be extracted inside the New Folder in the C drive. You can change the destination drive and the folder name according to your convenience.
- Lastly, go to the New Folder in the C drive and open it. You will find the extracted or unzipped files here.
With 7-Zip
Besides these built-in methods, you can also employ 7-Zip to unzip files in Windows 11. 7-Zip is a convenient, free tool that doesn’t ruin the experience with numerous pop-ups.
- First, download 7-Zip and install it on your Windows 11 PC.
- Right-click on the ZIP file and select Show More Options.
- Choose 7-Zip from the list and select Extract Files…
- After that, click the Three-Dot icon to choose the destination. Click OK. All the files will be extracted in the selected location.
- If you want to extract specific files from the ZIP, Right-click on the ZIP file and select Show more options.
- Open the file with 7-Zip and click Open Archive.
- This opens up 7-Zip, showing all the files inside.
- Select the desired files and click the Extract option on top.
- After that, choose the destination folder and click OK. The extracted or unzipped files will be available in the destination folder.
Does Windows 11 Have a Dedicated ZIP Program?
Yes, it does. Initially, Windows didn’t have built-in ZIP support. So, users had to rely on third-party programs like WinRAR or 7-Zip. But now, Microsoft has added ZIP support in File Explorer.
Is ZIP on Windows 11 Different from 7-Zip or RAR?
Essentially, no. Both are the same formats designed to compress files. But 7z file or 7-ZIP is a better archiving format that provides a higher level of compression, making the file size smaller than regular ZIP formats. But it also means file extraction takes longer, and users have to download and install a third-party program which is not convenient at all.
Zip or Unzip Files in Windows 11 Conveniently
The older Windows version didn’t come with built-in Zip support, and users had to rely on the third-party tool, but those days are long gone. Windows 11 now has ZIP support. You can zip or unzip files conveniently without involving any third-party tools. The article explains the steps to Zip or Unzip files in Windows 11. Check them out, and you will be good to go.