The program also allows you to get images from the internet and edit it any way you want; after copying them on the Paint canvas. Paint or Paint 3D app on Windows 11 is so popular still, a comprehensive guide is necessary if you truly want to master MS Paint. Our guide to Paint for Windows 11 users covers everything from various methods of launching MS Paint or Paint 3D to necessary keyboard shortcuts.
What is Microsoft Paint?
Microsoft Paint is a simple graphics editor. It is a part of the Windows OS and is accessible to every Windows user. The program can also save files in different formats, such as bitmap (BMP), JPEG, GIF, PNG, and single-page TIFF. Multiple tools for reshaping images are also available.
What are the Uses and Limitations of the Paint App?
The paint app on Windows OS is considered one of the best primary graphics editing tools. It has some genuine uses and certain limitations.
Uses of the Paint App
Microsoft Paint is an essential program used for drawing and creating different shapes. This Windows default tool is generally used for inserting screenshots from various applications, basic edits, and changing image formats. The best part is Microsoft Paint is free, and you do not have to pay for any updates, bug fixes, or that sort of thing. Regarding tools, MS Paint has a set of small brushes, pencils, and other drawing tools. These are sufficient for a primary tool capable of simple image manipulations. It is also capable of overlaying texts on top of images. Most importantly, this is a tool for beginners. If you want to learn image editing or editing as a whole, you should start with MS Paint. Paint also enables you to draw basic shapes, crop, resize and support multiple formats such as JPG, GIF, BMP, PNG, and more. Paint has tools like an eraser, eyedropper, pencil, magnifier, paintbrush, and spray. The accessibility is also great. Although, there are limited tool all of them are accessible from the main toolbar on top.
Limitations of the Paint App
While MS Paint is great and all, it has some severe limitations. First and foremost, this is a basic editing tool with basic capabilities. MS Paint doesn’t support multiple layers. You can’t create an image from scratch using layers. It is also not capable of adding new elements, recovering original work. Paint also doesn’t have any filters or retouching tools. If you are coming from a professional editing tool and want to use Paint for a day, your work will suffer. MS Paint doesn’t have a dedicated Smudge tool. The program is also missing several brush shapes considered essential by many professional digital illustrators. The program also doesn’t support other operating systems. Overall, Microsoft Paint is not bad. It is a great starting point. But from the perspective of a photo editing tool, it doesn’t work.
Launch Paint and Paint 3D App in Windows 11
Let’s begin the article with various ways to launch the Paint app on Windows 11. Yes, there are multiple ways to access the app, and we will show you how. So, here are all the ways to open Paint.
Open Paint Using Search in Windows 11
The Windows Search bar is probably the most convenient way to locate any application. You can use it to search and launch Paint.
- Click on the Search icon on your desktop’s Taskbar.
- Type Paint in the search field.
- Click the Paint app from the search results.
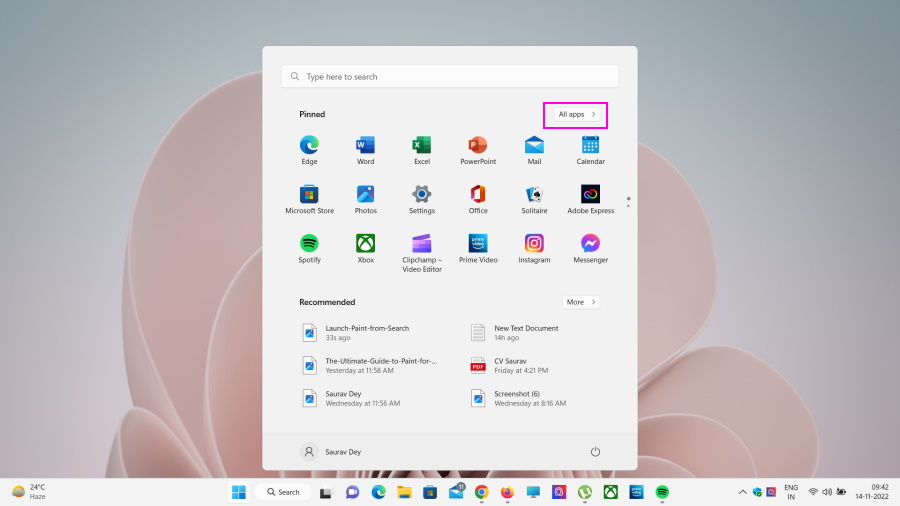
Open Paint from the Start Menu in Windows 11
You can also launch Paint from the Start Menu. Here are the steps.
- Click the Start button on the Taskbar.
- Click All apps at the top of the start menu.
- Scroll down to the P section under “All Apps page” to locate Paint and Paint 3D apps.
- Click to launch the apps.
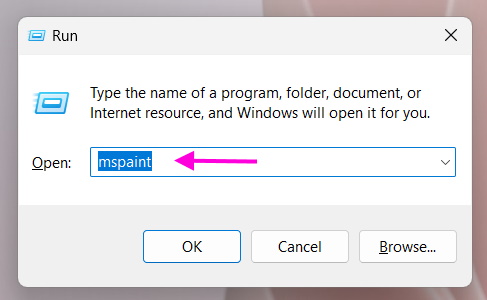
Open Paint Using the RUN Command in Windows 11
You can also use the RUN command to launch the Paint app on Windows 11.
- Press Win + R on the keyboard to launch the RUN dialogue box. Alternatively, click the Start button and type Run in the start menu.
- Type mspaint on the RUN input field, hit Enter on your keyboard, or click the OK button. You can only open the Paint app using the RUN command. The Paint 3D app doesn’t have any such command for execution.
Manage and Resize Paint and Paint 3D Canvas in Windows 11
After launching the Paint and Paint 3D app on Windows 11, you would like to use it, and the first step is to resize the Canvas. You should know that the canvas in Paint and Paint 3D is the part of the page that holds your image or object. So, the procedure to resize the canvas to save or edit in Paint is essential, along with the use of tools like Rulers, Gridlines, or Status Bar.
Resizing Paint Canvas
There are two ways to resize the Paint canvas. You can do it from the Image Properties option or directly with your mouse. Both procedures are detailed below.
From Image Properties
- After launching Paint, click the File option on the top left side of the Paint window.
- Select Image Properties from the drop menu. Alternatively, you can press Ctrl + E on your keyboard to open Image Properties.
- Now, you can use the Width and Height input fields to change the width and height of the Paint canvas, respectively.
- After changing the canvas to the desired size, click OK to save the changes.
- On the other hand, if you want the default canvas size back, click the Default button. After that, click OK.
With the Mouse Cursor
You can also use the mouse cursor for Paint canvas adjustment besides doing it from the Image Properties. Hover the mouse cursor on the Canvas bottom at the right corner of the Paint window, and wait until it turns into a two-headed arrow. After that, you can resize the canvas. Hold the left click; if you drag it downwards, the canvas size will increase, and dragging it upward will decrease the canvas size.
Resize Canvas in Paint 3D
If you want to increase the size of the canvas on Paint 3D, click the Zoom in icon (+), while you can use the Zoom out icon (–) to decrease the size of the Paint 3D canvas.
Add Rulers, Gridlines, or the Status Bar in Paint
Now, it’s time to add Rulers, Gridlines, or the Status Bar in Microsoft Paint. These features are disabled by default except for the Status Bar but enabling them is not a hard task. You can easily enable or disable Rulers, Gridlines, and Status Bar from the View tab. The View tab is on the header of the Paint app. Click it to access the options. A Checkmark sign should be visible beside them if the options are already enabled.
Draw Free Lines and Shapes in Paint and Paint 3D in Windows 11
After launching and resizing the canvas on the Paint and Paint 3D apps in Windows 11, it is time to draw on it. The following guide details how to draw free lines and shapes in the Paint app.
Draw Free Lines in Paint
If you truly want to learn to draw on MS Paint, you should be aware of all its features. Let’s start with the basics; drawing free lines and adding shapes. So, to start drawing lines on MS Paint, you need to choose the colors for the lines. Paint provides two sets of colors. Color 1 is set to Black by default, and Color 2 is set to White by default. But you can change these selections easily. Use left-click on Color 1 to change it from the wide array of color palettes available in MS Paint. Similarly, the right-click works for Color 2. Besides the lines, you can also change the color of the Paint canvas. Use the following steps.
- Click on either Color 1 or Color 2. Choose the color you desire and click the Fill icon under Tools.
- After that, make left-click on the canvas if you have selected Color 1, and right-click if your choice was Color 2.
- Let’s begin with free-hand drawing. First, you need to choose a color. As usual, the options are between Color 1 and Color 2.
- After that, select the color and click the Pencil icon under Tools to start drawing.
- You can draw by dragging the mouse freely while pressing the respective mouse button.
- The width of the line is also adjustable. Go to Size and choose your preferred width for the line from the drop menu.
- There’s also the Magnifier tool. You can expand your drawing by clicking on this tool. You can also use it on Paint canvas to expand it.
Draw Free Lines in Paint 3D
You can also draw free lines in Paint 3D. Here are the steps.
- Launch the Paint 3D app.
- Select the 2D Shapes beside Brushes on the top menu.
- Now, go to the Line and curve section on the right side of the Paint 3D window.
- Under the Line and curve section, Line, 3-point curve, 4-point curve, and 5-point curve options are available. Choose a curve of your choice and start drawing.
- After you start drawing, more options will be available on the right side of the Paint 3D interface. You can use them to change the color, opacity, and thickness of the drawn line.
Draw Shapes in Paint
It is not enough just to know to draw the free lines on MS Paint. It would help if you learned to draw the shapes too.
- There’s a Shapes button on the Paint window. Click it and choose the shape you desire from the drop menu.
- After that, hold the left click and drag the mouse cursor over the part of the Paint canvas where you want to draw the shape.
Draw Shapes in Paint 3D
Besides free lines, you can use Paint 3D shapes on Windows 11. You can draw two types of shape 2D shape or 3D shape. Follow the steps below to draw shapes in Paint 3D.
2D Shapes in Paint 3D
Let’s start with 2D shapes.
- Launch the Paint 3D app.
- Click the 2D Shapes option from the top menu.
- After that, you can choose any 2D shape of your choice from the right side of the Paint 3D interface.
- There are multiple shapes to choose from. After choosing a shape, you can start drawing. As usual, several customization options will be accessible after you start drawing the shape. You can use them to change the color and the thickness of the 2D shape.
3D Shapes in Paint 3D
After 2D shapes, it is time to move on to the 3D shapes. Creating 3D shapes is a key feature of the Paint 3D application.
- Launch the Paint 3D application.
- Click the 3D Shapes option from the top menu.
- After that, choose a 3D Shape from the right side of the Paint 3D interface.
- There are three categories. 3D Doodle, 3D Objects and 3D Models. Each category represents a different type of 3D shape.
- You can start drawing after choosing a category. If you want to access more options for 3D shapes, click the 3D Library option on the right side.
Erase Object in Paint and Paint 3D in Windows 11
Just knowing to draw the free lines or shapes on Paint isn’t enough. You also need to know to erase them if the situation calls for it.
- Click the Eraser icon under Tools.
- After that, hold the left click and run the cursor on the part of the drawing you want to erase.
- Microsoft tactfully designed the Eraser tool on Paint and Paint 3D to work exactly, like how you use erasers in real life. You have to run the eraser on the spot multiple times to completely erase that specific part of the drawing.
Add Texts in Paint and Paint 3D on Windows 11
Adding text in Paint and Paint 3D is not a difficult task. Both applications have a dedicated text feature that lets you add text of your choice and color anywhere on the canvas.
Add Texts in Paint on Windows 11
Adding text in Paint is easy. The editing app has a dedicated text tool. Here are the steps to use it.
- So, launch the Paint app.
- Select the Text tool under the Tools tab. (Looks like the alphabet “A”)
- After that, you have to select a part of the image or the canvas where you want to add the text.
- Start typing after selecting the location.
- The Text Tool offers multiple customization options similar to Microsoft Office. You can change the font and size of the text. Also, change its color; boldening, italicizing, or underlining options are also available.
Add Texts in Paint 3D on Windows 11
As you may have guessed, you can also add text in the Paint 3D app. Here’s how to do it.
- Let’s start by launching the Paint 3D app.
- Click the Text option from the top menu.
- After that, select a part of the Paint 3D canvas and start typing.
- After typing the text, you will have access to several options from the right side of the Paint 3D interface. These are called Text Formatting Tools. You can use them to change the font, size, and color of the text.
Text Formatting Tools in Paint/Paint 3D on Windows 11
If you also want to know to use the Text Formatting Tools on MS Paint, check the following guide.
- Let’s start with increasing and decreasing the size of the text. First, you have to select or highlight the text.
- After that, click the box with a number and a down arrow. This is the Font Size. Choose a number from the list to increase or decrease the font size of the text.
- You can also change the color of the text. Highlight the text and click on Color 1. Color 1 changes the text color. You can choose from the available color palettes.
- Color 2 is for changing the background color. Choose Color 2 and then check the box beside the Background fill option. The background color will change.
- As usual, Color 1 is set to “Black,” and Color 2 is set to “White” by default.
Copy And Paste Images into Paint and Paint 3D on Windows 11
Copy and Paste images on the Paint and Paint 3D interface is not a difficult task. Check out the detailed steps for both Paint and the Paint 3D apps below.
Copy and Paste Images into Paint
Here are the steps to copy and paste images in Paint on Windows 11.
- Launch the Paint app.
- Choose the Select tool from the Images tab.
- Select the object you want to copy; it will have a dotted line around it after the selection is complete.
- After that, right-click on the selected object and click Copy.
- You have the option to select Cut instead of Copy. If you select Cut, then the object will be moved from its current location, and you can paste it into a different area of the canvas. While doing this, you will have access to additional options such as Crop, Select All, and Delete.
- After copying the object or the shape, right-click on the canvas and select the Paste option. The copied shape or object will be placed on the Paint canvas. You can also copy an external image and paste it into the Paint canvas.
- Click the Paste option under the Clipboard tab.
- After that, select the Import option.
- Finally, you will reach the Paste From panel. You need to locate and open the folder that contains the target image. Then, choose the image and click the Open button. The image will paste into the canvas automatically.
Copy and Paste Images into Paint 3D
You can also copy and paste images on the Paint 3D interface. The best part about copying and pasting images in Paint 3D is that it is easier to use compared to MS Paint. You just have to right-click on the target image and choose the Copy option. The image will be copied to the clipboard. Now, you can paste it anywhere on the Paint 3D canvas with another right-click.
Open Images in Paint and Paint 3D on Windows 11
Here’s how to open images in Paint and Paint 3D applications on Windows 11, respectively.
Open Images in Paint
After copying and pasting images in the Paint and Paint 3D interface, it is time to open images in Paint. Check out the steps below.
- Launch the paint app.
- Click the File option at the top left side of the Paint interface.
- After that, select the Open option from the drop menu. Alternatively, you can press Ctrl + O keys on your keyboard.
- Now, a window will open, and you have to locate the folder where the image you want to open is stored. After you have located the image, click to select the image and then, click the Open button below to open the image in Paint. Alternatively, you can double-click the image to open it in the Paint canvas.
Open Images in Paint 3D
Follow the steps below to open images in the Paint 3D application on your Windows 11 computer.
- Launch the Paint 3D app.
- Click the Menu option on the top left side of the Paint 3D window.
- The Open should be selected by default in the following interface.
- Click Browse Files on the right side.
- Now, you have to locate the image you want to open. After locating the image, double-click to open it in Paint 3D. Alternatively, you can click the image after locating it, then click the Open button to open the image in Paint 3D.
Delete Objects in Paint and Paint 3D on Windows 11
Now, it is time to delete objects in Paint and Paint 3D. Please, check the detailed steps below.
Delete Objects in Paint
The following steps show how to delete objects in MS Paint.
- Open the Paint app.
- Choose the Select tool under the Image tab.
- After that, you have to select the object you want to delete. Select the object using the cursor, creating a dotted line around it.
- Now, make right-click and choose Delete from the available options. However, you can also choose to press the Delete key on your keyboard to delete the object after selection.
Delete Objects in Paint 3D
You can also delete objects in the Paint 3D application by using the following steps.
- Open the Paint 3D app.
- Click the Select option on the Paint 3D interface.
- Now, select the object you want to delete using your mouse. It will have a dotted line around it after selection.
- After that, right-click and select Delete from the available options. As mentioned in the Paint section, you can directly use the Delete key on your keyboard instead of using the right-click.
Merge Images in Paint and Paint 3D on Windows 11
Merging two images is one of the most exciting features and you can do it on Paint, and Paint 3D.
Merge Images in Paint
Here are the steps for merging two images in MS Paint. The process is a bit complicated. Read the steps carefully.
- Launch the Paint app.
- Click the Paste option under the Clipboard tab.
- After that, select the Import option from the drop menu.
- Now, open the image in Paint after locating it.
- You can also make the image smaller. Hover the mouse cursor at the bottom right corner of the picture until the cursor turns into a double-sided arrow. Then, hold the left click and move it upwards. It is an essential step. It allows you to add another picture to the canvas.
- Now, you have to repeat the process for the second picture. Open the second picture of your choice, and resize it. After that, you save it, or you can press Ctrl + A to select the merged pictures to copy.
Merge Pictures in Paint 3D
Here are the steps to merge images in the Paint 3D application.
- Open the Paint 3D application.
- Click the Menu button at the top left side of the Paint 3D interface.
- After that, click the Insert option on the left side.
- Then, locate the desired image and click the Open button at the bottom.
- After opening the first image, you have to resize it. Now, repeat the process for the second image and save.
Resize, Crop, and Rotate Images in Paint and Paint 3D on Windows 11
Most people use MS Paint and Paint 3D for editing images. That means resizing, cropping, and rotating or flipping images. Check out the following part to learn all these.
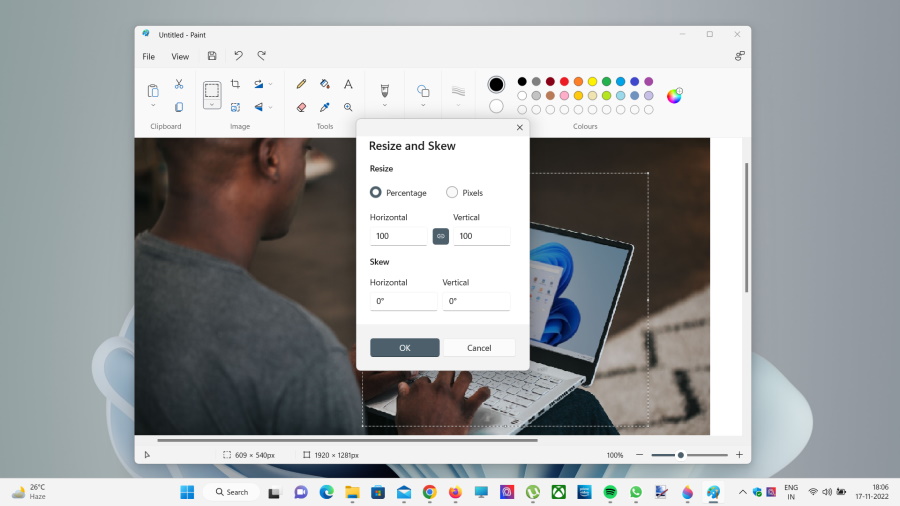
Resize an Image in Paint
Let’s start with resizing an image in MS Paint.
- First, open the image you want to resize in Paint.
- Right-click on the target image and hover over the Open With option.
- Another drop menu will appear; select Paint from that list.
- Go to the Status Bar on top and click the Resize icon under the Image tab.
- This will launch the Resize and Skew window. You can resize images from here.
- The Resize and Skew window offers two ways to resize an image. You can do it via Percentage or Pixels. The Percentage option is selected by default. If you are going to resize the image using the Percentage method, change the Horizontal and Vertical values. They should show 100 by default. Changing the values will change the size of the image accordingly. After you are finished resizing the image, click OK in the Resize and Skew window to save the changes. The same procedure applies to the Pixels method. You can change the Horizontal and Vertical values to change the size of the image. Here, you have the option to maintain the Aspect Ratio of the image. It is enabled by default. So, if you change the Horizontal value, the Vertical value will change accordingly and vice-versa. But you can disable the Aspect Ratio option. If you disable the option, you can change both Horizontal and Vertical values manually. After you are done resizing, click OK in the Resize and Skew window to save the changes.
Resize an Image in Paint 3D
After Paint, it is time to resize images in Paint 3D.
- First, open the image you want to resize in Paint 3D.
- Right-click on the target image and hover over the Open With option.
- Another drop menu will appear; select Paint 3D from that list.
- After opening the image with Paint 3D, click the Canvas option from the top menu.
- The Canvas option will appear on the right side of the Paint 3D interface. The height and width of the current canvas will be visible here, along with Lock Aspect Ratio and Resize Image with Canvas options.
- Lock Aspect Ratio option keeps the image from stretching or distorting by locking the aspect ratio of the image.
- Resize Image with Canvas option changes the image with the canvas. If you change the size of the canvas, the image size will also change accordingly. Generally, the canvas size is the image size unless you have inserted an image without a background. In that case, Paint 3D provides the image with a white background.
- If you want to properly resize the image on Paint 3D, you need to disable these two options. You also have the option to resize the image via pixels or a percentage, similar to MS Paint. You can choose your preferred method by clicking the arrow in the box below and selecting the preferred method.
Crop Image in Paint
After resizing, it is time to crop the image in MS Paint.
- Open the image with MS Paint.
- Choose the Select tool from the Images tab.
- Now, select the part of the target image you want to keep.
- After that, make right-click on the selected part of the image and click the Crop option.
- Alternatively, after selecting the part of the image you want to keep, click the Crop tool under the Images tab, or you can press Ctrl + Shift + X to crop the image instantly.
Crop Image in Paint 3D
The cropping tool in Paint 3D is well beyond what is offered by MS Paint. It is an advanced tool. Check out the steps for it below.
- Open the target image in Paint 3D.
- After that, click the Crop option available just below the header on the Paint 3D interface.
- The image automatically comes into the frame, and multiple cropping options will be visible on the right side of the Paint 3D interface.
- You can choose a framing from the available options under Choose Your Framing, or you can click the Custom button below it to make a custom selection.
- After selecting the frame, click the Done button to crop the image.
- You can also access the Width and Height fields under the Crop options available on the right side of the Paint 3D panel.
- Paint 3D also provides the option to Lock Aspect Ratio. You can tick the box beside this option when using a custom frame to preserve the aspect ratio of the image. Doing this won’t stretch or blur the image.
Rotate or Flip an Image in Paint
You can also flip or rotate an image on MS Paint. It involves a few simple steps. Check them out below.
- Open an image in MS Paint.
- Click the Rotate option in the Image tab.
- Microsoft Paint provides three image rotation options on Paint. Rotate Left 90 Degrees, Rotate Right 90 Degrees, and Rotate 180 Degrees. Choose the option that is required for your work.
- There’s also a Flip option available under the Image tab if you want to flip the image. You also get two options for flipping an image. Flip Vertical and Flip Horizontal.
Rotate or Flip Images in Paint 3D
Follow the steps below to rotate or flip images in Paint 3D on Windows 11.
- Let’s start with inserting the image into the Paint 3D interface.
- After that, select the image using the Select tool on top. Alternatively, you can press Ctrl + A keys on your keyboard to select the image.
- On the right side of the Paint 3D interface, the option to flip and rotate will appear. Click them to rotate or flip the image.
- The option will be available under Rotate and Flip category. You get two options for rotating the image. Rotate 90 Degrees Left and Rotate 90 Degrees Right. The same goes for flipping the image. Flip Horizontal (Along the Y-Axis) and Flip Vertical (Along the X-Axis).
Save Images in Paint and Paint 3D on Windows 11
Just resizing and editing the image on MS Paint and Paint 3D is not enough, you have to know how to save your work. Otherwise; you may lose all your progress due to unforeseen circumstances.
Save Images in Paint
Follow the steps below to save images in MS Paint. It’s an easy process.
- After you are done editing the image or in the middle of it, click the File button at the header of the MS Paint interface.
- Hover over the Save As option from the drop menu.
- A new drop menu will appear for selecting the format of the saved image.
- Choose a format; for example, JPEG.
- After selecting the image format, the Save As window will open. You can choose a location for the saved image.
- You can also change the name of the image from the Save As window.
- After selecting a location and changing the name, click the Save button at the bottom of the Save As panel to save the image.
- The saved image will be available at the chosen location in the selected format and under the changed name.
- This procedure is only for saving a specific image for the first time. After executing the above procedure, if you still have a little editing work left on the image, click the Save option instead of save as in the File menu.
- Alternatively, you can press Ctrl + S keys on your keyboard to save the progress. Most advanced MS Paint users prefer using the keyboard shortcut.
Save Images in Paint 3D
Saving images in Paint 3D is also an easy process, but a little different from what you have learned on MS Paint.
- After your work is complete with the image, click the Menu option on the header of the Paint 3D interface.
- After that, click the Save As option from the right side of the window.
- Now, click the Image option under Choose a Format(Only for 2D Formats). As usual, the Save As window will open. You can change the format and the name of the image. Also, choose the location where you want to store.
- If you are working on a 3D image, click the Paint 3D Project button below. A new window will pop up. You can change the name and click Save in Paint 3D button.
- You only have to do it for the first time for a respective image. If you are going to work further on the same image, you don’t have to do all these. Simply click the Save button under Menu.
Print in Paint And Paint 3D on Windows 11
We already went through most of the main features of the Paint and Paint 3D applications. You can also use Paint to print images. However, this feature is used by a very limited number of people. Still, this is an important feature. So, let’s check out the steps.
Print in Paint on Windows 11
Printing an image using the MS Paint app is not a difficult task. The steps are as follows.
- Open the image in Paint.
- Click the File option at the top of the Paint interface.
- Hover over the Print option, and a new drop menu will open with Print, Page Setup, and Print preview options.
- Select the Print option. Alternatively, you can press Ctrl + P to access it directly.
- On the Print window, choose your printer and the orientation. Then, click the Print button below.
- If you want to customize a bit more before hitting the Print button, click the More Settings option. From the More Settings window, you can change the layout of the page.
- You can also access Advanced Options. You will be able to change the number of copies and the paper size from here.
Print in Paint 3D on Windows 11
If you can print images in Paint, you can also do the same in Paint 3D. Check out the steps below.
- First, open the target image in Paint 3D.
- Click on the Menu option visible at the top of the paint 3D interface.
- After that, click the Print option from the left side of the window.
- You have to decide what you want, as there are options for 2D and 3D printing.
- After choosing between 2D print and 3D print, the Print dialogue box will open.
- More options are available, like the size of the paper or the orientation of the paper, etc. You will also be able to adjust qualities like scaling, alignment, and the number of copies.
- After you are done, click the Print button at the bottom left side.
Send A Paint and Paint 3D Image Via Email on Windows 11
Finally, after resizing, cropping, merging, flipping, rotating, and saving the image on MS Paint and Paint 3D, the last feature remains sending the Paint images via email.
Email A Paint or Paint 3D Image Using Copy and Paste Method
You will find the process of sending paint images via email similar to how we usually send images through email apps. We will use the Windows 11 default email application for this purpose. So, follow the steps below to send images via email using the copy-and-paste method.
- You need to make right-click on the Paint or Paint 3D image.
- Choose the Copy icon.
- After that, click the New mail button on the Windows 11 Mail app.
- Make right-click on the free space on the body of the mail and select Paste.
- Lastly, click the Send button at the top right corner after typing the receiver’s email address. Note: This process is not limited to Paint or Paint 3D images, you can use it to send all types of images via the mail app.
Email A Paint or Paint 3D Image By Inserting the Image
You have already learned to send a Paint or Paint 3D image via email using the copy-and-paste method. But there’s another way to do it. It is by inserting the image. So, without further ado, let’s jump into it. We will be using the Windows 11 Mail app for this purpose as we did in the previous method. But you can use the procedure on other email apps.
- Launch the Windows 11 Mail app.
- Click the New Mail option on the right side of the window.
- Click the Insert tab.
- After that, click the Files icon.
- Now, you have to locate the folder where the Paint or Paint 3D image is saved.
- After locating the target image, click the Open button at the bottom right of the window. Alternatively, you can double-click to open the target image.
- Lastly, click Send after adding the email address of the receiver. Note: This process is also not limited to Paint or Paint 3D images, you can use it to send all types of images via the mail app.
Set A Paint Image As Desktop Background in Windows 11
This is a bit outside the realm of the Paint guide. But You should know how to set the image you spent so long perfecting as your desktop background.
- After you are finished editing the image, click the File button at the top left side of the window.
- Then, hover over the Set as Desktop Background option.
- Now, you have to choose a background option… you can choose among Fill, Tile, or Center.
Microsoft Paint Keyboard Shortcuts
You already know all there is to know about MS Paint and its operation. However, you should learn the keyboard shortcuts for Paint. It will enhance your Paint experience. Let’s check them out.
Is Microsoft Paint Available In Windows 11?
Absolutely! The first version of Paint was introduced in the November of 1985 with Windows 1.0. It was launched as a competitor to Macintosh’s MacPaint. After that, MS Paint was available in every interaction of Microsoft Windows, including Windows 11.
When Did Paint 3D Come Out?
Paint 3D was launched on 5th April 2017 with the 1703 version of Microsoft Windows 10.
How many times can you undo in Paint?
Most users have no idea, but there’s a limit to how many times you can undo in Paint. You can do it three times.
Did Microsoft replace Paint?
The answer is Paint 3D. But Microsoft didn’t replace Paint. It is still available alongside Paint 3D. Both Paint and Paint 3D has become standard Windows application.
Is Microsoft Paint Free?
Yes, Microsoft Paint is free. It is a default graphics editor tool on Windows OS.
Final Words
So, this is our complete guide to Paint for Windows 11. You see, Microsoft Paint is a great tool. It has what it takes to be the best preliminary image editing tool. But as simple as it is, the program has quite a few tools, and proper navigation through them is necessary if you truly want to know MS Paint and Paint 3D. Particularly, we have Paint’s most useful features or tools in this guide. You should go through the guide carefully to learn all the options and features of this basic graphics editing tool. Now, you shouldn’t come across any issues while using Paint or Paint 3D. Still, you will need time to get used to it.
Read Next: Get Help With File Explorer in Windows 11